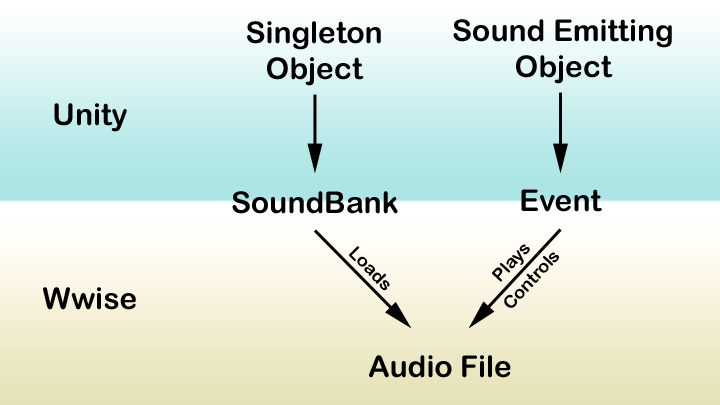
After spending another session learning about Wwise, I think I have developed an understanding that will help with Unity-Wwise integration. Please refer to the following diagram as I outline the steps for getting your first sound emitting object up and running in VR with Unity. I will start at the bottom of the chain in Wwise and work up to the top in Unity.
The Big Picture

First, you have to create the Event and SoundBank in Wwise, generate the appropriate files, and save the Wwise project so those objects are present in the Wwise picker in unity. That requires:
Steps to set up SoundBank and Event integration in Wwise
- Importing the audio files into Wwise under the Audio Tab?s Actor-Mixer Hierarchy for the ?Default Work Unit?
- From Creating an Event what will be embedded into a Unity Object
- Adding the Audio File to the Event.
- Creating a sound bank
- Adding the Audio file to the Soundbank.
- Setting up a ShareSet in the Audio files properties to add position-related effects
Steps to set up SoundBank and Event integration in Unity
Referring to the diagram above, two things are required in Unity to get sound going once you have integrated Wwise into your project.
- To get your game objects in unity to produce sound with positional control, you have to attach a Wwise event to them.
- To load the audio needed for playback, you need to designate a singleton game object to contain a Wwise SoundBank.
So let’s dig in to each step. While there are video tutorials on how to do this, I found it too easy to miss a step. So here?s my sure-fire formula to get your project playing sound as soon as you press play in Unity.
Create a new Unity project and import the Steam VR asset pack.
Launch Unity (I recommend Using the latest version) and create a new project. Go to the following asset store URL, and open it in Unity by clicking the blue ?Open in Unity? button on the right:
https://assetstore.unity.com/packages/tools/integration/steamvr-plugin-32647
Follow the instructions for installation, and accept all the default choices that are presented.
Use the interactions example scene as an easy starting point
Go to the project navigator, and open the ?Assets? folder, then Navigate from the Assets folder to ?Assets/Steam VR/Samples. Now double-click the ?Interactions_Example.unity? scene to load it as the default.
Without firing up your VR gear, make sure everything works after setup by pressing ?play? and using the keyboard W-A-S-D keys to navigate within the scene. You should notice a blazing torch in the scene. For this example, let’s create a fire sound for that torch.

Once that all works and you have had a few minutes of fun navigating the Steam-VR demo, save the project and close unity.
Run the Wwise Launcher and integrate Wwise into your new Unity project.
Open the Wwise Launcher (Again, I recommend installing the latest version from https://www.audiokinetic.com/download/ ). Click the ?UNITY? text on the top row, then find your new Unity project and click the ?Integrate Wwise into project? button for that project. You should be able to use all the default options to get going for now.
Once the integration finishes you should see a success message and now have a ?Open in Wwise? button available for the unity project. Go ahead and click that button to prepare for the next step.
Open your new Wwise project and create your Audio object.
For my torch sound, I did a quick internet search for fire sounds. I found a nice WAV loop to use. Pick your own WAV file (using a WAV here will make it easier to follow later). For reference, whatever you download, rename it to ?torch.wav?.
Go to Wwise?s top menu, and open ?Project? and then ?Import Audio Files? about a third of the way down. The audio file importer will pop up. Click on the ?Add Files?? button on the left.

This will bring up a file browser. Navigate to your ?Torch.wav? that you found on the internet, and click ?Open? to import it. You should now see one file listed under the word ?Audio File/Folder?, and the object type should be Sound SFX. When that all checks out, click the ?Import? button to complete the file import. If the sound does not appear as a Sound SFX, try finding another sound for your torch.
You should now see ?Torch? listed in the Project Explorer?s ?Audio? tab:

Double-click on the icon to the left of ?Torch? to open the Audio clip?s ?Sound Property Editor? window. Click the ?General Settings? tab, and find the ?Loop? checkbox on the right. Check this box so the playback later will be looped.
Press the space bar to hear your looped torch sound play back. If it doesn?t sound right or stops before looping, something went wrong above. Once everything checks out, you can close the Sound Property Editor window.
Set up a ShareSet to define how your Audio Clip is affected by the distance to the viewer.
Next, we are going to set up some parameters that will allow the relative position of the listener to impact the sound of the torch. Select the ?ShareSets? tab in the project explorer, and under ?Attenuations?, right-click the ?Default Work List? item and select ?New Child?, then ?Attenuation?. Name this item ?Torch Attenuation?
In the Project Explorer Window, open up the Audio Tab, and double-click your ?Torch? clip to bring up the property editor. Now click on the ?Positioning? tab. About ? way down there is an ?Attenuation? check box – make sure that is checked and that the ?Mode? setting is set to ?Use ShareSets?. Now click the ?>>? button and select your ?Torch Attenuation? from the menu. To make sure the proper relative position is applied during playback, find the ?3D Spatialization? setting and make sure it is set to ?Position?. The Positioning settings should look like the following:

Now, click the ?Edit?? button to edit your attenuation and you should see something like this:

You can double-click to add points to the red line to get a nice falloff in the sound. I would also recommend reducing the max distance (lower right) from 100 to about 20 game units (meters by default in unity).
How to preview your attenuation ShareSet
If you press the space bar, playback is started, and you can drag the ?Distance (0.000)? flag above left and right to hear your sound at various distances.? Once that sounds right, close the torch Attenuation editor.
Set up your Torch Event
Getting things properly positioned in the sound field
Now that the audio event is set up and configured for positional audio, its time to create the event that will be connected to the sound emitting object in Unity. Back in the ?Project Explorer?, click on the ?Events? tab, and then right click on the ?Default Work Unit? under ?Events?, and select ?New Child? then ?Event?, and name the new event ?Torch Event?. You should be in the ?Designer? Layout here, which you can set up by opening to the ?Layouts? menu at the top and selecting ?Designer?. If you are in the designer and have created (or selected) the ?Torch Event?, you will see the ?Torch_Event? in the Event Editor to the right of the project explorer.
Carefully click on the ?Audio? tab in the project explorer and drag and drop your ?Torch? audio clip into the torch event editor to add it. A new item should appear with a ?Play? type for the event.

Setup your Torch SoundBank
We are almost done in Wwise. For this next step, its best to be in the SoundBank layout. So open the Layouts menu at the top and select ?SoundBank?. The soundbank manager window should appear. Click the ?New?? Button and name the SoundBank ?Torch Soundbank?. Like we did for the Event, carefully go to the Project Explorer window, click the ?Audio? tab, then drag the ?Torch? audio clip to the SoundBank Editor Window in the bottom middle. You should see the torch clip appear inside.

And the last step in Wwise is to generate the sound bank and save the project so Unity has everything it needs to link the SoundBank and the Event we created to our unity project. To do that, first, mouse up to the SoundBank Manager window and check the box to the left of ?Torch_Soundbank?

Then make sure your desired platform and languages are selected, and click the ?Generate Selected? button along the top row of buttons. A ?Generating SoundBanks? window should appear, and the process should complete without errors in the log. Once that is done, close the ?Generating SoundBanks? window.
Lastly, open the Project menu at the top, and select ?Save? to save the Wwise project.
Connecting our SoundBank and Event in Unity
Launch Unity (either from the Wwise launcher, or via the Unity Launcher), and make sure the Steam VR project we created earlier is loaded. Once that is loaded, take a look at the tabbed pane at the bottom and find the ?Wwise Picker?. This is where Wwise will place all the items it integrates into unity. You should now see something like this:

Make sure you open the Events and SoundBanks folders by clicking the ?+? buttons, and also the ?Default Work Unit? folders. You should then see the ?Torch_Event? and the ?Torch_Soundbank? as above in the picker.
Select the ?Scene? view in Unity, and navigate through the scene until you find the torch:

Then click on the torch to select it:

Then Drag the ?Torch_Event? from the Wwise picker into the inspector for the selected torch:

It should look like this after the drag:

Leave the settings at their default values for now (but they will be fun to play with later!). Next, find the ?WwiseGlobal? game object in the scene?s hierarchy window and select it:

Then drag the Torch_Soundbank from the Wwise picker to the Inspector window on the right so it looks like this (The Ak Bank item should be new) after the drag:

Again, leave all the settings at their default values. And here comes the fun part: Press play to try our your sound emitter. If everything went according to plan, you should now hear a torch sound pan as you turn, and decrease in volume if you move away from the torch. Well Done!
Isn?t there an easier way?
Looking back, there sure are a lot of steps to get a single torch sound added to unity. How might the makers of Wwise shorten the process? How about a ?New Sound Emitter Wizard? button on the top row of the Wwise picker?
Pressing that button could pull up a dialog with several options:
- Sound to Load
- Base name for new Audio, Event, and SoundBank items.
- Loop setting
- Event Type setting.
- Ability to add to an existing SoundBank.
- Functionality to link the audio to an existing SoundSet for attenuating the sound.
- Ability to select the target game object for the emitter (defaulting to the selected game object(s) ).
- Ability to select the target game object to host the SoundBank.
Then with a few tweaks and the click of the ?Apply? button, you?d be ready to hear your sound in 30 seconds or less. Let?s hope the AudioKinetic team can find a way to make something like this a reality in the future…